This guide enables a TLS websocket on a plain Asterisk server (chan_sip or PJSIP stack) so that WebRTC Client can register extensions from the browser. Using a distribution with a web interface? See the guides for FreePBX, VitalPBX, MirtaPBX or Issabel.
Requirements
- Asterisk 11 or later (Asterisk 16+ with PJSIP recommended)
- A valid TLS certificate for the server's hostname — not self-signed, because browsers refuse websocket connections to untrusted certificates
- Inbound TCP port
8089open and forwarded to the Asterisk server - UDP RTP ports (default
10000–20000) reachable for media
Step 1 — Install the certificate
Upload a valid certificate and private key to the server, for example to /etc/ssl/certs/ and /etc/ssl/private/. A free Let's Encrypt certificate works fine.
Step 2 — Enable the TLS web server
Edit /etc/asterisk/http.conf:
[general]
enabled=no            ; disable plain HTTP
tlsenable=yes
tlsbindaddr=0.0.0.0:8089
tlscertfile=/etc/ssl/certs/my.cert.pem
tlsprivatekey=/etc/ssl/private/my.key.pem
Step 3 — Enable the websocket
chan_sip stack — in /etc/asterisk/sip.conf:
[general]
websocket_enabled=yes
PJSIP stack — disable the chan_sip websocket in /etc/asterisk/sip.conf so that PJSIP can handle it, and make sure a websocket transport exists in pjsip.conf:
; sip.conf
[general]
websocket_enabled=no

; pjsip.conf
[transport-wss]
type=transport
protocol=wss
bind=0.0.0.0
Step 4 — ICE and STUN
Add to /etc/asterisk/rtp.conf:
[general]
icesupport=true
stunaddr=stun.l.google.com:19302
If the server is behind NAT, also map its private IP to its public IP:
[ice_host_candidates]
192.168.1.100 => 12.12.12.12
More public STUN servers are listed in STUN servers.
Step 5 — Restart and verify
Restart Asterisk and check that the websocket is listening:
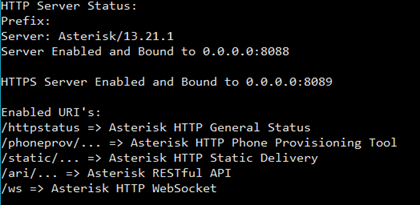
asterisk -rx 'http show status'You should see the HTTPS server enabled and bound to 0.0.0.0:8089, and the /ws URI listed:
Step 6 — Configure WebRTC extensions
For every extension that will be used with WebRTC Client, enable WebRTC and SRTP. For PJSIP endpoints, webrtc=yes sets the right defaults (AVPF, ICE, rtcp-mux, DTLS-SRTP):
[1001]
type=endpoint
webrtc=yes
transport=transport-wss
context=from-internal
disallow=all
allow=opus,ulaw,alaw
auth=1001
aors=1001
For chan_sip peers, set transport=wss, avpf=yes, icesupport=yes, encryption=yes, dtlsenable=yes and the matching DTLS certificate options.
Step 7 — Firewall
Allow inbound TCP 8089 and your RTP range to the Asterisk machine, and forward them on your router if the server is behind NAT.
Next steps
Enter the websocket server (hostname), port 8089 and path /ws in the management portal — see Configure server settings.